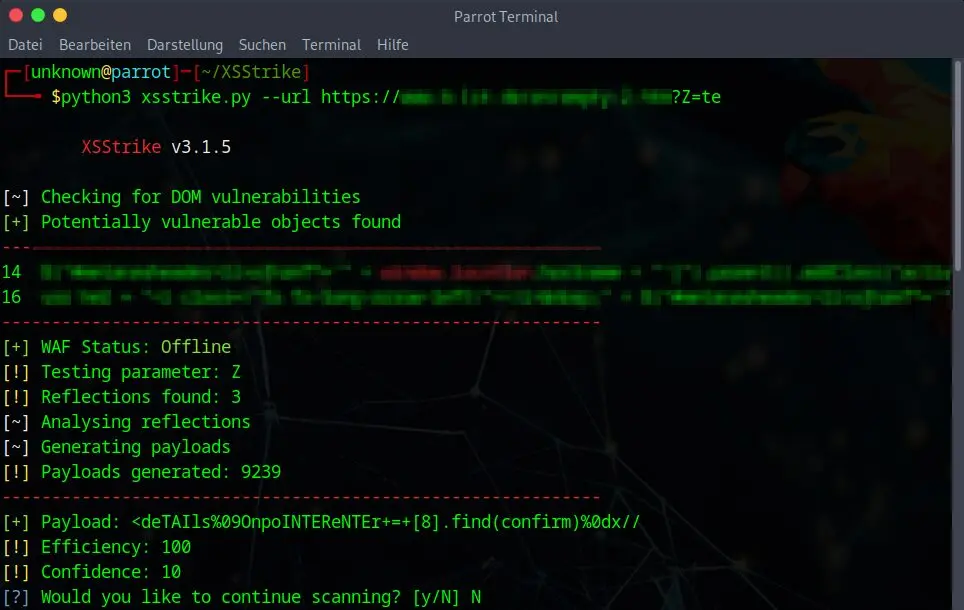
XSStrike is widely regarded as one of the most advanced open-source scanners for Cross-Site Scripting (XSS). Instead of blindly firing a payload list at a target, it first analyses how your input is reflected in the server's response using four hand-written parsers, then crafts a payload built for that exact context. This XSStrike tutorial walks you through installing and running the scanner correctly in 2026.
What sets this guide apart: every command below was checked against XSStrike's actual source code. Many tutorials, including some of the most-read ones, reference a --params flag that does not exist in the current code. A supposed -o flag for saving results is another phantom. We only use options that genuinely work, and we are honest about the tool's limits.
This article assumes you already understand the basics of XSS (reflected, stored and DOM-based). If you do not, read our XSS fundamentals article first. Here we focus on the hands-on work with the tool itself.
What XSStrike is and who it is for
XSStrike (repository: github.com/s0md3v/XSStrike, author s0md3v, GPL-3.0) describes itself as a "Cross Site Scripting detection suite equipped with four hand written parsers, an intelligent payload generator, a powerful fuzzing engine and an incredibly fast crawler". The key difference from simple scanners is context analysis: XSStrike works out whether your input lands in HTML text, inside an attribute, in a <script> block or in an event handler, and tailors the payload accordingly. Cross-Site Scripting remains one of the classic attack classes in the OWASP Top 10, which is why a reliable scanner for it still matters.
Under the hood it relies on three sibling projects by the same author: Photon as the crawler, Zetanize as the HTML parser and Arjun for parameter discovery. Core features per the README:
- Reflected and DOM XSS scanning
- Multi-threaded crawling
- Context analysis and intelligent payload generation
- WAF detection and evasion
- A fuzzing engine to test filters
- Blind XSS support
- Bruteforcing payloads from a file
- Payload encoding
- Scanning for outdated JavaScript libraries
Important limitation: reliable only for reflected XSS
Even though the README promises "Reflected and DOM XSS scanning", there is a boundary that almost no tutorial mentions: in practice XSStrike is primarily a tool for reflected XSS. The bug-bounty platform HackerOne explicitly categorises XSStrike as a tool that "only supports reflected" XSS, in contrast to Dalfox, which also covers stored XSS. Stored vulnerabilities, where the payload is persisted in a database and served elsewhere, are inherently hard for an automated query scanner to catch.
On top of that, the changelog shows that version 3.1.3 "Removed browser engine emulation". The earlier validation of DOM findings through a real browser engine is gone. Treat DOM hits as leads to verify manually in a browser, not as proven vulnerabilities.
Is XSStrike still current in 2026? An honest maintenance status
Most tutorials stay silent on the health of the project. Here is where it actually stands (checked via the GitHub API on 12 July 2026):
- The repository is not archived and carries no "no longer maintained" notice.
- The maintainer's last code push dates to 26 April 2025, more than a year ago.
- The latest official release is 3.1.6 from 17 March 2025.
- The project has around 15,000 stars and over 2,000 forks with roughly 92 open issues.
- The community is still active: in 2026 several open pull requests exist, among them a test suite with CI/CD (PR #444, June 2026) and bug fixes (PR #443, PR #439). None have been merged yet.
The honest verdict: XSStrike is not dead, but its original maintainer has not pushed code in over a year. Development now comes almost entirely from open community PRs. Roadmap items from the FAQ, such as a Burp Suite plugin or a browser extension, were never actually shipped. For a 2026 tutorial that means the tool works and is stable, but do not expect new features any time soon.
Prerequisites
XSStrike is a Python 3 tool. The source code explicitly aborts on Python 2 with the message "Use python > 3.4 to run XSStrike". Beyond that documented minimum, we recommend Python 3.7 or newer in practice. It needs only three external packages, listed in requirements.txt:
tldfuzzywuzzyrequests
According to the wiki the tool is tested on Linux, Termux, Windows and macOS. Note that coloured console output does not work reliably on Windows and macOS, but does on Linux.
Installation: three routes in detail
Route 1: git clone plus pip (official)
The standard route documented in the README:
git clone https://github.com/s0md3v/XSStrike
cd XSStrike
pip install -r requirements.txt --break-system-packages
Then run the tool with:
python xsstrike.pyA note on invocation: on current Debian, Ubuntu and Kali systems there is often no python alias outside a virtual environment, only python3. In that case start the tool with python3 xsstrike.py. Inside the venv described further down, python works reliably.
The --break-system-packages flag is a newer addition to the official README and the most common stumbling block. On modern Debian, Ubuntu and Kali systems the system Python is marked as "externally managed" under PEP 668. Without this flag, pip install aborts with error: externally-managed-environment. The flag lets the install proceed, but it writes into the system-wide Python environment.
Route 2: virtual environment (recommended)
Cleaner, and without touching system Python, is a virtual environment. This is what we recommend for most users:
git clone https://github.com/s0md3v/XSStrike
cd XSStrike
python3 -m venv venv
source venv/bin/activate
pip install -r requirements.txt
python xsstrike.py -h
Inside the activated environment you do not need --break-system-packages, because pip writes into an isolated directory instead of the system environment.
Route 3: apt install on Kali Linux
Little known: XSStrike ships as a ready-made Kali package. Worth knowing, it is not preinstalled on Kali (unlike Nmap, Nikto or SQLMap), so you have to install it yourself:
sudo apt install xsstrikeThe Kali package matches version 3.1.6 and pulls in the dependencies python3-tld, python3-fuzzywuzzy and python3-requests. The package route is convenient, but it may install a pinned, slightly older version than the current GitHub master branch.
Optional extra packages to silence warnings
Some guides recommend two additional packages that are not in requirements.txt:
pip install python-Levenshtein prettytablefuzzywuzzy internally recommends python-Levenshtein for better performance, otherwise it prints a warning and falls back to a slower pure-Python implementation. prettytable improves table output. Both are optional, not a required step.
Special case Termux (Android)
For mobile testing under Termux you need an extra step that no desktop tutorial mentions. Newer urllib3 versions (2.x) cause compatibility problems there:
pkg update && pkg upgrade && pkg install git python -y
git clone https://github.com/s0md3v/XSStrike.git
cd XSStrike
pip install -r requirements.txt
pip uninstall -y urllib3 && pip install "urllib3<2"
python xsstrike.py -h
The urllib3<2 downgrade on the second-to-last line is the critical step. If you see similar SSL or connection errors on a desktop, this downgrade can help there too.
Every CLI flag at a glance (source-verified)
The table below lists the options that actually exist in the argparse definition of xsstrike.py (as of the 26 April 2025 push). --params and -o are deliberately not here, because they are missing from the code.
| Flag | Meaning | Default |
|---|---|---|
-u, --url | Target URL | none |
--data | POST data | none |
--json | Treat POST data as JSON | off |
--path | Inject payload into the URL path instead of query parameters | off |
--crawl | Crawl the target | off |
-l, --level | Crawling depth | 2 |
--seeds | Load crawling seeds from a file | none |
-f, --file | Load payloads from a file (bruteforce) | none |
--fuzzer | Test filters and WAF (fuzzing) | off |
--blind | Inject a blind XSS payload while crawling | off |
--skip-dom | Skip DOM checking | off |
--skip | Skip prompts and POC generation | off |
-e, --encode | Encode payloads (e.g. base64) | none |
--headers | Add HTTP headers | none |
-t, --threads | Number of concurrent requests | 10 |
-d, --delay | Delay between requests (seconds) | 0 |
--timeout | Request timeout (seconds) | 10 |
--proxy | Use a proxy | 0.0.0.0:8080 |
--update | Check for updates | off |
--console-log-level | Console logging level | INFO |
--file-log-level | File logging level | none |
--log-file | Log file name | xsstrike.log |
An important note on defaults: older tutorials often claim "2 threads, 7 second timeout". The current source (core/config.py) actually sets threadCount = 10, timeout = 10 and delay = 0. When in doubt, trust the code rather than dated wiki figures.
The wrong --fuzz flag
A very common mistake (present even in earlier versions of this article) is the flag --fuzz. The correct flag is --fuzzer. The name fuzz is merely the internal argparse destination variable (dest='fuzz'), not the command-line option. On the command line only --fuzzer works.
Practical workflows step by step
XSStrike decides which mode to run based on the flags you set. In simplified terms: --fuzzer starts the fuzzing mode, -f/--file starts the bruteforce mode, --crawl or --seeds start the crawler, and without any of these it runs the normal single-URL scan.
> Legal note up front: run the commands below only against systems you have explicit permission to test, or against the legal practice targets listed further down. See the "Legal considerations" section.
Workflow 1: find reflected XSS on a single URL
The entry-level command. You pass a URL with a query parameter for XSStrike to test:
python xsstrike.py -u "http://testphp.vulnweb.com/listproducts.php?cat=1"XSStrike first checks for DOM vulnerabilities, detects any WAF in front, then tests each parameter for reflections and generates context-aware payloads on a hit. A typical output on a finding looks like this (illustrative):
        XSStrike v3.1.6

[~] Checking for DOM vulnerabilities
[+] WAF Status: Offline
[!] Testing parameter: cat
[!] Reflections found: 1
[~] Analysing reflections
[~] Generating payloads
[!] Payloads generated: 3072
------------------------------------------------------------
[+] Payload: <a%0aonmouseover=confirm()>v3dm0s
[!] Efficiency: 100
[!] Confidence: 10
------------------------------------------------------------
The string v3dm0s is no accident: it is defined in core/config.py as xsschecker and serves as a harmless marker XSStrike uses to detect reflections. Efficiency indicates how well the payload beats the context (payloads below minEfficiency = 90 are not shown at all), and Confidence is the likelihood of a real hit.
Workflow 2: skip the DOM check (faster scans)
For pure reflected testing you can turn off DOM analysis to save time:
python xsstrike.py -u "http://testphp.vulnweb.com/listproducts.php?cat=1" --skip-domWorkflow 3: test POST requests and JSON data
Many vulnerable endpoints accept POST data. Pass it with --data:
python xsstrike.py -u "http://example.local/search.php" --data "q=query"If the application processes JSON, add --json so XSStrike treats the body correctly:
python xsstrike.py -u "http://example.local/api/search" --data '{"q":"query"}' --jsonWorkflow 4: inject into the URL path
With URL rewriting the user input sits in the path rather than a query parameter. Use --path:
python xsstrike.py -u "http://example.local/search/query" --pathWorkflow 5: crawl an entire domain
Rather than specifying each URL, XSStrike unleashes the Photon crawler, which collects forms and parameters automatically. Control the crawling depth with -l and concurrency with -t:
python xsstrike.py -u "http://testphp.vulnweb.com/" --crawl -l 3 -t 10Alternatively, load a list of seed URLs from a file:
python xsstrike.py --seeds urls.txt --crawlA word of caution: XSStrike is very fast. On large targets a high thread count creates significant load. In those cases add a delay and reduce the threads.
Workflow 6: fuzzing and WAF analysis
The --fuzzer mode sends a built-in list of fuzz strings against a parameter to see which characters and tags a Web Application Firewall lets through or blocks. That is the basis for targeted WAF evasion:
python xsstrike.py -u "http://example.local/search.php?q=query" --fuzzer -d 1The -d 1 (one second delay) makes sense while fuzzing to avoid hitting a rate limit. XSStrike then tests strings such as <test, <test>, <test x=y or <test/oNxX=yYy// and reports for each whether it is filtered, partly filtered or reflected unchanged.
Workflow 7: your own payloads via bruteforce
If you have your own payload list, load it with -f. XSStrike switches to bruteforce mode and works through your payloads instead of generating its own:
python xsstrike.py -u "http://example.local/search.php?q=query" -f payloads.txtWorkflow 8: blind XSS
Blind XSS is not visible immediately but executes later, for instance in an admin backend. XSStrike injects a callback payload you define into every form it finds while crawling. Important: the payload is not passed as a flag but must be set beforehand in core/config.py in the blindPayload variable (empty by default). A self-hosted xsshunter instance is a suitable callback service.
python xsstrike.py -u "http://example.local/contact.php" --crawl --blindBlind XSS injection works only in crawling mode, not in a simple single-URL scan.
Other useful options
Pass HTTP headers or cookies (e.g. for authenticated areas):
python xsstrike.py -u "http://example.local/faq.php?lang=q" --headers "Cookie: session=abc123"Encode payloads to bypass simple filters:
python xsstrike.py -u "http://example.local/faq.php?lang=q" -e base64Route through a proxy (e.g. Burp on 0.0.0.0:8080) to capture traffic:
python xsstrike.py -u "http://example.local/faq.php?lang=q" --proxyCheck for updates:
python xsstrike.py --updateVerifying the finding
A scanner hit is not yet proof. Copy the payload XSStrike prints into the relevant URL or form field and open the result in a browser. If the browser executes the script (for example a confirm() popup), the vulnerability is confirmed. This manual step is mandatory for DOM hits especially, because XSStrike has not used a browser engine for validation since version 3.1.3 and can therefore report false positives.
The underlying methodology is described by the OWASP Web Security Testing Guide (WSTG-INPV-01) in three phases: identify input vectors, feed in test data, examine the resulting HTML for unfiltered special characters (<, >, &, ', "). XSStrike automates exactly these steps, but it does not replace manual reasoning.
What to do after the finding? A brief note on remediation
Once you have confirmed a flaw in your own code, it needs fixing. The most important countermeasures for reflected XSS:
- Context-aware output encoding: in PHP for example
htmlspecialchars()instead of raw output, so that<and>become<and>. - Content Security Policy (CSP): a restrictive CSP using a nonce for inline scripts instead of
unsafe-inline. - Input validation: validate and normalise user input server-side before processing it.
A deeper treatment of remediation is beyond this scope, which is about finding. For the defensive side, our framework-level XSS protection guide for ReactJS is worth a look.
Alternatives to XSStrike
No single tool covers everything. Place XSStrike within a wider tooling ecosystem:
| Tool | Language | Covers | Strength |
|---|---|---|---|
| XSStrike | Python | reflected XSS, limited DOM | own crawler, context analysis, deep single-page analysis |
| Dalfox | Go | reflected and stored XSS | very fast, batch/pipe processing, callback integration |
| XSSer | Python | reflected and stored XSS | GUI option, many injection vectors |
| Burp Suite (DOM Invader) | Java | all XSS types, esp. DOM | source/sink analysis, interactive proxy, industry standard |
| OWASP ZAP | Java | broad web scanning | free, active/passive scanner |
In practice many testers combine Dalfox and XSStrike: Dalfox for fast, broad scanning across many endpoints after a recon phase, then XSStrike for deeper analysis of individual interesting targets. For stored and complex DOM XSS, Burp Suite is often unavoidable.
Legal practice targets for training
Never run XSStrike against someone else's live systems without permission. For practice there are deliberately vulnerable environments:
- testphp.vulnweb.com (Acunetix VulnWeb): permanently online and cleared for security testing, ideal for a first
--crawlrun. - DVWA (Damn Vulnerable Web Application): PHP app with adjustable security levels, deployable locally.
- OWASP Juice Shop: a modern Node.js app with many built-in flaws, launchable locally via Docker.
- PortSwigger Web Security Academy: around 30 dedicated XSS labs with a structured learning path.
- Google XSS Game and alert(1) to win: browser-based filter-bypass challenges.
- bWAPP, OWASP WebGoat, HackThisSite: further lesson- and mission-based platforms.
For your first steps, a locally hosted app (http://127.0.0.1/...) is the safest route, because you have full control and harm no one.
Legal considerations
Running XSStrike against systems you do not have explicit permission to test is illegal in most jurisdictions. Even mere unauthorised scanning can constitute an offence. Before any test against a system you do not own, obtain written authorisation. In bug-bounty programmes, permission derives from the programme's rules (scope). When in doubt: only your own systems or designated practice environments.
Conclusion
Even in 2026, XSStrike remains a capable scanner for reflected XSS, with a smart approach combining context analysis and fuzzing-driven payload generation. Once you know the right flags (and avoid the wrong ones such as --params, -o or --fuzz), a handful of commands cover single-page scans, crawling, POST/JSON tests, WAF fuzzing and blind XSS.
At the same time, know the limits: the maintainer has been inactive since April 2025, the tool barely covers stored XSS, and DOM findings need manual verification. For a complete picture, combine XSStrike with Dalfox or Burp Suite. And however good the tool is, it replaces neither an understanding of the XSS fundamentals nor the explicit permission to test a target in the first place.
Frequently asked questions about XSStrike
Is the fuzzing flag --fuzz or --fuzzer?
The correct command-line flag is --fuzzer. fuzz is only the internal destination variable in the source code. Guides that use --fuzz are simply wrong here, the command does not work that way.
Why does the installation fail with "externally-managed-environment"?
Modern Debian, Ubuntu and Kali systems protect their system Python under PEP 668. Either use a virtual environment (python3 -m venv venv && source venv/bin/activate) or append --break-system-packages to the pip install command. The virtual environment is the cleaner route.
Does XSStrike also find stored XSS?
Barely. XSStrike is built for reflected XSS. For stored XSS, tools such as Dalfox or Burp Suite are a better fit, because the payload and the point of execution are separate and a pure query scanner struggles to capture that.
Is XSStrike still being developed in 2026?
The repository is not archived, but the maintainer has not pushed code since 26 April 2025. The latest release is 3.1.6 from March 2025. Activity now comes almost entirely from open community pull requests. The tool is stable to use, but no major new features are on the horizon.